Deploying a static WordPress site with Builderius gives you the speed and security of static hosting without leaving the WordPress editor you already know. You build with the page builder you’re used to, then export pure HTML, CSS and JavaScript to Cloudflare Pages or GitHub Pages — no PHP, no database queries on every request, no hosting lock-in.
Static WordPress has been having a moment lately. Builderius, Astro, and tools like PhantomWP have all made the conversation around performance and security louder than ever. Joost, the main person behind the Yoast SEO plugin, mentioned recently that he also moved his site to Astro. With Builderius, you no longer have to abandon WordPress to get those benefits.
In this tutorial, you’ll learn how to connect Builderius to a deploy target, generate a static release and publish your site, with step-by-step guides for both Cloudflare Pages and GitHub Pages.
What You’ll Need
Some links in this tutorial are affiliate links. I may earn a small commission at no extra cost to you. Thank you for supporting the channel!
- A WordPress site built with Builderius
- A free Cloudflare account (for Cloudflare Pages deployment) or a GitHub account (for GitHub Pages deployment)
- The Builderius plugin (v1.3.4 or higher), installed and activated
Note — Cloudflare Pages free plan limits: the free tier is generous for most static sites, but it’s worth a glance before you start. It includes 1 concurrent build, 500 builds per month (each capped at 20 minutes), up to 20,000 files per site, 100 custom domains per project, and unlimited bandwidth and requests. Individual files must be 25 MiB or smaller. See Cloudflare Pages limits for the full table.
How Builderius Static Export Works
Builderius includes a built-in deploy system under Settings → Deploy. When you trigger a deployment, Builderius crawls all of your pages and posts, bundles the HTML, CSS, JavaScript, and assets into a zip file, and then uploads that package directly to your chosen hosting platform.
The result is a fully static version of your WordPress site, identical in appearance to the dynamic version, but without any server-side processing on each request.
Note: Form submissions do not yet work out of the box on static exports. The Builderius team are preparing a dedicated tutorial on this.
Deploying to Cloudflare Pages
Cloudflare Pages is a free static site hosting platform with generous limits and a global CDN. It’s the recommended starting point for most Builderius users.
Step 1: Create a Cloudflare API Token
- Log in to your Cloudflare dashboard.
- In the top-right corner, click your profile icon and go to My Profile.
- Select API Tokens from the left sidebar.
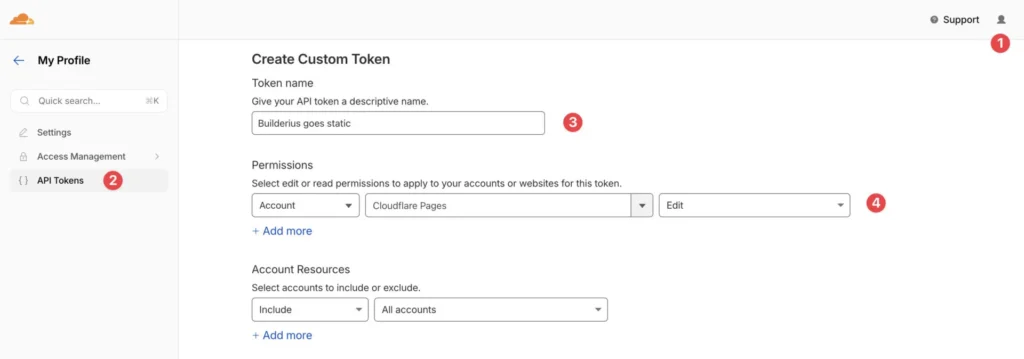
- Click Create Token, then choose Create Custom Token.
- Give the token a name (e.g.
builderius-deploy). - Under Permissions, set the following:
- Account → Cloudflare Pages → Edit
- Leave the remaining settings at their defaults unless you want to restrict by IP address.
- Click Continue to summary, then Create Token.
- Copy the token now and store it somewhere safe — Cloudflare won’t show it again.
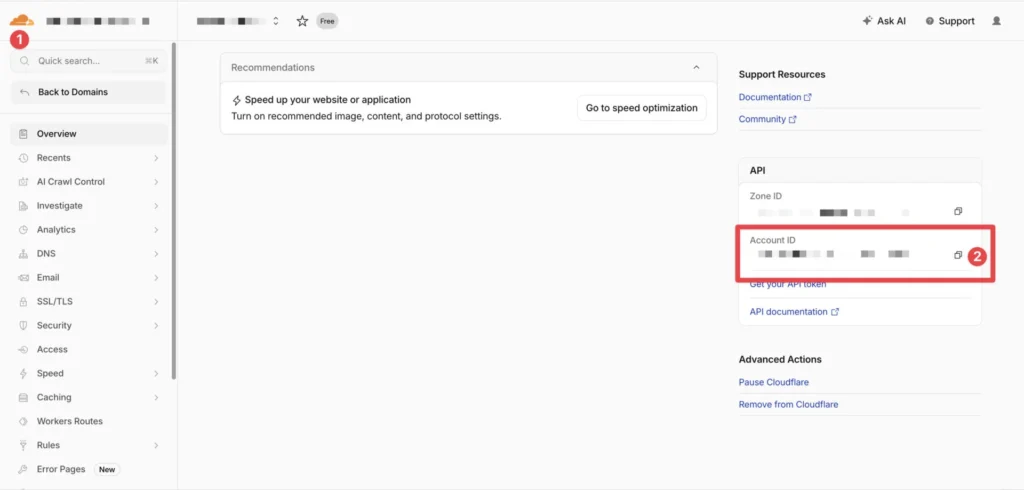
Step 2: Find Your Cloudflare Account ID
- In your Cloudflare dashboard, navigate to any of your existing Pages projects (or the Workers & Pages overview).
- Scroll to the bottom of the right-hand sidebar to find Account ID.
- Copy the Account ID. You will need it in the next step.
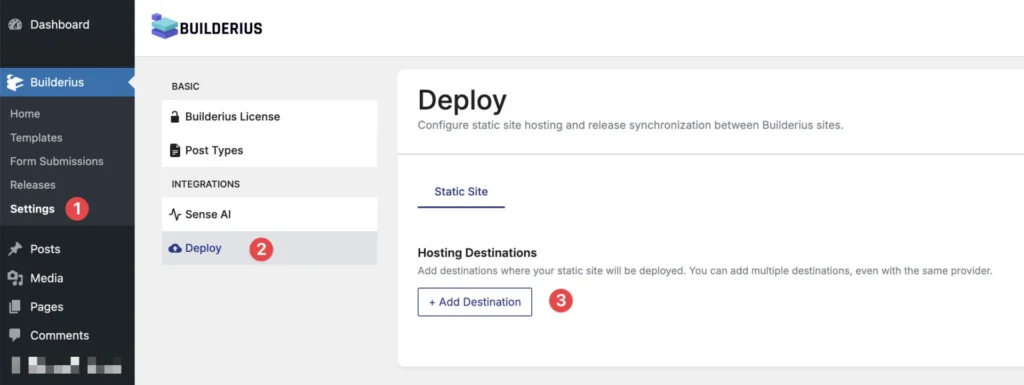
Step 3: Connect Builderius to Cloudflare Pages
- In your WordPress admin, go to Builderius → Settings.
(The settings panel can take a few seconds to load — known issue, fix coming.) - Select the Deploy tab.
- Click Add Location.
- Fill in the fields:
- Name: a label for this deploy target (e.g.
My Conference Site) - Provider: select Cloudflare Pages
- API Token: paste the token you copied in Step 1
- Account ID: paste the Account ID from Step 2
- Project Name: enter a slug for your Cloudflare Pages project. Use lowercase letters and hyphens only, no spaces or capital letters (e.g.
uac-conference)
- Name: a label for this deploy target (e.g.
- Click Save, then click Test Connection.
If everything is configured correctly, you’ll see a Connected successfully message.

Step 4: Create a Release
Before you can deploy, Builderius requires you to create a release, a versioned snapshot of your site.
- Navigate to Builderius → Releases.
- Click Create New Release.
- Enter a version number (e.g.
1.4), add a tag (e.g.static), and write a description. - Click Publish Release.
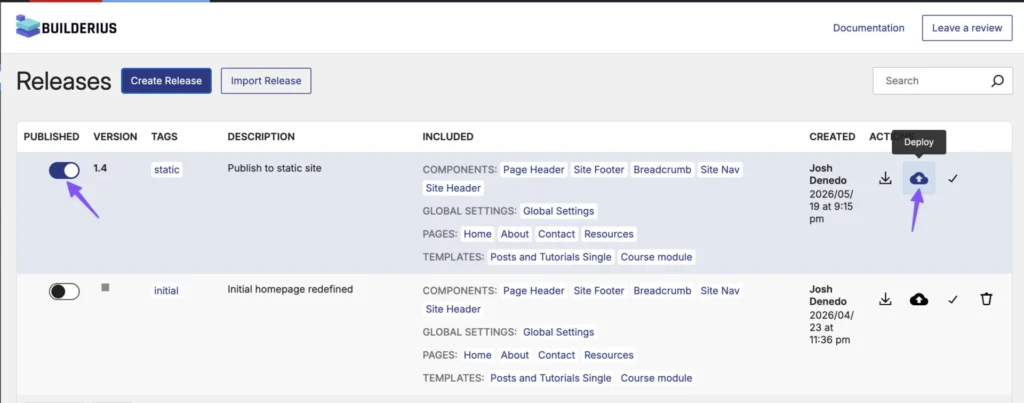
Step 5: Deploy to Cloudflare Pages
- Stay on the Builderius → Releases page.
- Click the Deploy button.
- You’ll see a list of all pages, posts and templates available for deployment. Untick any you’d like to exclude, or leave everything selected.
- Click Next.
- On the Generate step, leave the settings at their defaults and click Generate. Builderius will crawl your site and bundle everything into a static zip file.
- Once generation is complete, click Deploy and confirm.
Builderius will upload the static package to Cloudflare Pages. Once the deployment finishes, your site will be live at your Cloudflare Pages URL (e.g. your-project.pages.dev).
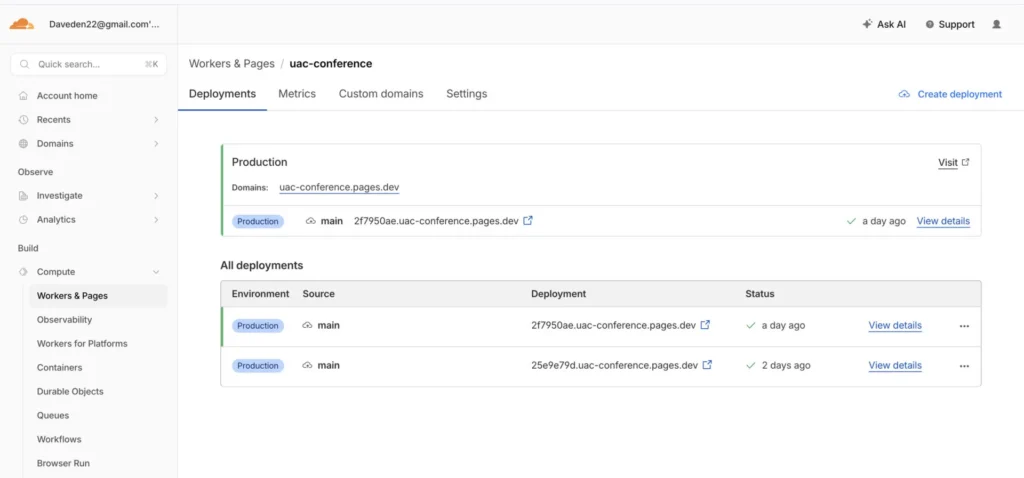
You can verify the deployment by logging in to Cloudflare and navigating to Workers & Pages. Your project will appear there with the latest deployment listed.
Step 6: Add a Custom Domain
Once your site is deployed, you can swap the default your-project.pages.dev URL for your own domain.
- In the Cloudflare dashboard, open your Pages project and select the Custom domains tab.
- Click Set up a custom domain and enter the domain or subdomain you’d like to use (e.g.
www.example.com). - Cloudflare will detect whether your domain’s DNS is already managed by Cloudflare. If it is, the CNAME record is added for you. If not, follow the on-screen prompt to add a CNAME pointing to your
pages.devURL at your DNS provider. - Wait a minute or two while the domain verifies (Cloudflare auto-provisions SSL in the background).
- Once the status shows Active, your custom domain is live.
Deploying to GitHub Pages
GitHub Pages is a free static hosting service built into GitHub. It’s a solid alternative to Cloudflare Pages, particularly if your project already lives in a GitHub repository or if you prefer to keep your deployment history in version control.
Step 1: Create a GitHub Repository
- Log in to GitHub and create a new repository.
- Set the repository to Public (required for free GitHub Pages hosting on personal accounts).
- Note the repository name. You will need it shortly.
Step 2: Enable GitHub Pages on the Repository
- Open your repository on GitHub and go to Settings → Pages.
- Under Source, select Deploy from a branch.
- Choose the branch Builderius will push to.
gh-pagesis the conventional choice. If the branch doesn’t exist yet, Builderius will create it on first deploy. - Set the folder to
/ (root)and click Save.
Step 3: Create a GitHub Personal Access Token
- In GitHub, go to Settings → Developer settings → Personal access tokens → Tokens (classic).
- Click Generate new token (classic).
- Give it a descriptive name (e.g.
builderius-deploy). - Under Scopes, tick repo (this grants read/write access to your repositories).
- Click Generate token and copy it immediately. You will not be able to see it again.
Step 4: Connect Builderius to GitHub Pages
- In WordPress, go to Builderius → Settings → Deploy.
- Click Add Location.
- Fill in the fields:
- Name: a label for this target (e.g.
GitHub Pages) - Provider: select GitHub Pages
- Personal Access Token: paste the token you created above
- GitHub Username: your GitHub username or organisation name
- Repository Name: the exact name of the repository you created
- Branch:
gh-pages(or whichever branch you configured in Step 2)
- Name: a label for this target (e.g.
- Click Save, then Test Connection to confirm the credentials are correct.
Step 5: Create a Release and Deploy
The release and deploy process is identical to the Cloudflare Pages workflow:
- Go to Builderius → Releases, create a new release with a version number and the
statictag, and publish it. - Go to Builderius → Deploy, select your GitHub Pages location, choose your pages, click Next, generate the static files, then click Deploy.
Once complete, your site will be live at https://yourusername.github.io/your-repo-name. If you’ve configured a custom domain in GitHub Pages settings, it’ll resolve there instead.
Testing Your Static Site Locally
If you want to preview the static export before pushing it live, Builderius can export a zip file you can serve from a local environment.
- In Builderius → Deploy, click Export and select Export Static Site.
- Download the zip file.
- Extract the contents into a folder on your local server (Laravel Herd, Local WP, or any PHP-capable local environment will work).
- Set up a local domain pointing to that folder.
You can then browse the static version of your site locally before deploying to production.
What You Get: Static Speed Without Leaving WordPress
Once deployed, your site is served from pre-built HTML files rather than dynamically generated on each request. There’s no PHP to execute, no database to query, and no WordPress overhead on the critical path. The result is a noticeably faster site, with the same visual output you built in the Builderius page builder.
You keep the familiar WordPress editing experience. Your visitors get the performance benefits of a static site. That’s the best of both worlds.
Links & Further Reading
- Builderius: WordPress page builder with built-in static site export
- Massive improvements to Builderius: a sneak peek into the enhanced Collection element — deeper look at what’s new in Builderius.
- More Builderius tutorials on Daveden.
Support the Channel
If you found this tutorial helpful, you can support the channel here. Every contribution means a lot!
Comments
No comments yet — be the first.
Leave a comment
Replying to .
Thanks — your comment is in
It's awaiting moderation and will appear after it's approved and the site is rebuilt.