For a long time, there’s been a gap between our AI agents and our WordPress sites. You jump between your ChatGPT chat session and your WordPress admin, copying answers back and forth, and losing half your time to context switching.
Novamira closes that gap. It’s an MCP (Model Context Protocol) bridge that lets your AI agent (Claude Code, Codex, Antigravity, Claude Desktop, whichever you prefer) actually work inside your WordPress install. Not paste suggestions through a chat window: actually run WP-CLI, register custom post types, populate fields, upload media, edit Bricks templates, create pages even with the Elementor atomic editor, and so much more.
In this walkthrough, I connect Novamira to a local WordPress site and use Claude Code (with voice input via OpenWhispr) to build out a fictional accessibility conference using Bricks Builder and Meta Box. By the end of the session, the site has its content model, demo data, a fully wired CSS framework, and a hero section cloned from a reference page, all done conversationally.
What you need to get started
Four pieces:
- An AI agent. My pick is Visual Studio Code with the Claude Code extension. Claude Desktop, Antigravity, Cursor and a plain terminal session of Claude Code or OpenCode all work too.
- A subscription or token for the agent: an Anthropic key for Claude Code, OpenAI for Codex, and so on.
- A WordPress site. Use a local install or a staging environment. Never a production site. More on that later.
- Novamira plugin, installed on the WordPress site. Get it via my affiliate link: Novamira.
Novamira ships as two plugins: the free Novamira core (open source on GitHub, contribute if you can) and Novamira Pro, which extends core with abilities for custom field plugins (ACF, Meta Box, Pods, JetEngine, ACPT, ASE) and page builders (Bricks, Elementor).
System requirements
Before you start, here’s what each side of the setup actually needs. I’ve split it into the agent (Claude Code, in my case) and the WordPress site Novamira runs on.
For Claude Code (the AI agent)
- Operating system: macOS 13.0+, Windows 10 1809+ (or Windows Server 2019+), or Linux (Ubuntu 20.04+, Debian 10+, or Alpine 3.19+). On Windows you can run it natively or inside WSL 2.
- Node.js 18 or later: The native Claude Code installer (
curl -fsSL https://claude.ai/install.sh | bash) bundles its own runtime, so it’s tempting to assume you can skip Node, but you can’t. Novamira’s MCP bridge connects through the@automattic/mcp-wordpress-remotepackage, which Claude Code launches withnpx. No Node, nonpx, no bridge, so install Node regardless of how you installed Claude Code (Node 20 or 22 LTS is a safe bet). The npm install route,npm install -g @anthropic-ai/claude-code, needs it too. - Hardware: 4 GB RAM minimum (8 GB+ is comfortable), on an x64 or ARM64 processor.
- A shell and a connection: Bash, Zsh, PowerShell or CMD, plus an internet connection.
- A Claude account: Pro, Max, Team, Enterprise or a Console (API) account. The free Claude.ai plan does not include Claude Code. Using a different agent? Swap in its own credential instead: an OpenAI key for Codex, and so on.
For the WordPress site (Novamira)
- WordPress 6.9 or later. Novamira builds on the WordPress Abilities API, so a current core version matters. I ran this on WordPress 7.0.
- PHP 8.0 or later. My site was on PHP 8.3.
- Novamira core (free), plus Novamira Pro if you want the page-builder and custom-field abilities (Bricks, Elementor, ACF, Meta Box and the rest).
- A local or staging environment. Novamira is bound to the site URL and goes dormant on your live domain, so build here, then push to production.
- Your pagebuilder and custom field plugin. In this walkthrough, I used Bricks Builder and Meta Box. Their matching Novamira Pro abilities only surface when the plugin is active.
Inside Novamira: abilities, skills and memory
Once installed, head to Novamira → Abilities in the WordPress sidebar. These are the actions you’ve granted the AI agent: WP-CLI, raw PHP, registering CPTs, writing custom field values, building Bricks elements, and so on. The Pro abilities surface dynamically based on the plugins you have active. I had ASE, Bricks Builder and Meta Box installed, so those abilities appeared. ACF or JetEngine ones would have surfaced instead if those were installed.
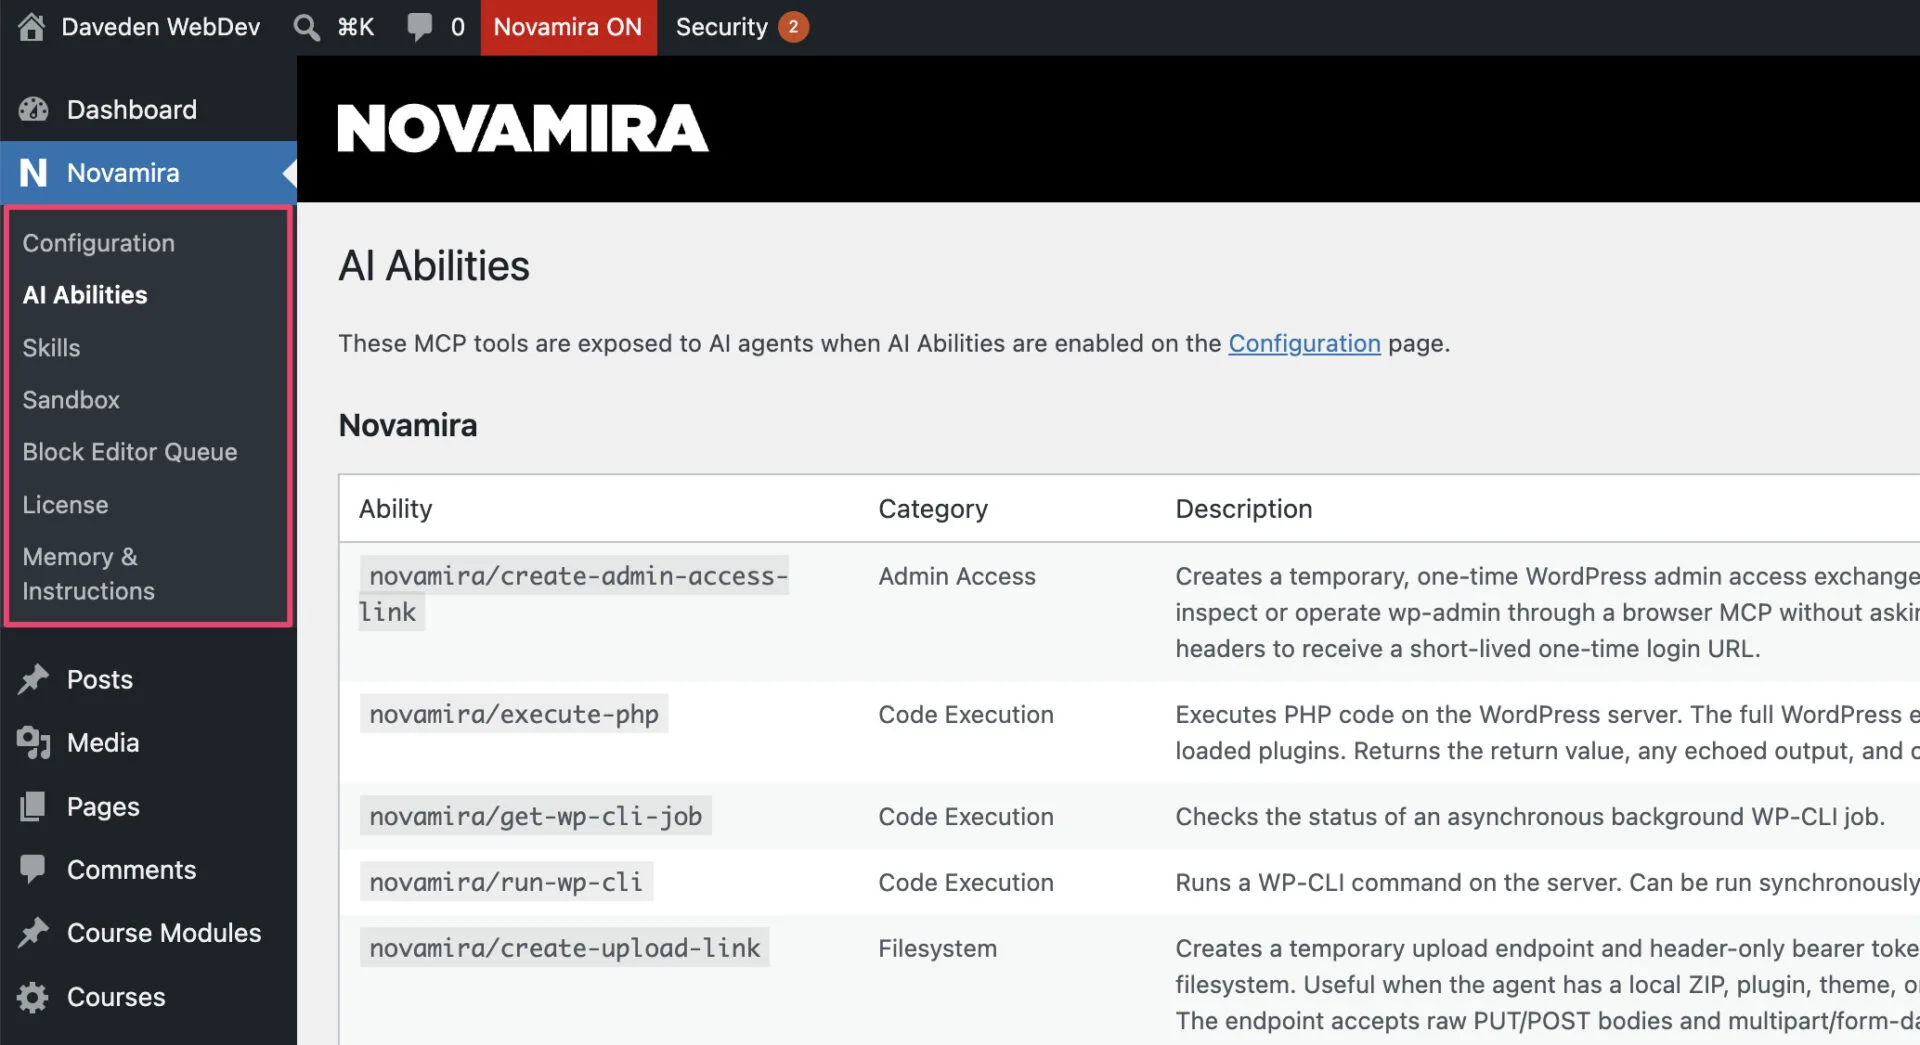
Next to abilities are skills: specific procedural recipes the agent follows for recurring tasks. There’s a skill for ACF, ACPT, ASE, Bricks, and so on. There’s also a built-in skill-creator skill that walks you through building your own via natural language. In the AI era, you might as well let the agent author its own skills with your input.
Memory and instructions are the agent’s persistent layer. Custom instructions are high-level project context: brand tone, language preferences, the kind of thing you’d write at the top of every prompt anyway. Memories are scoped to user, project or feedback, so the agent remembers your tone of voice, your stack preferences, and any fixes it had to discover along the way. Crucially, memory is shared across agents: start in Claude Code, switch to Codex, and everything carries over.
Finally, the sandbox stores any PHP Novamira writes (code snippets, custom functions) so they can be reverted or disabled cleanly if anything goes wrong.
Connecting Claude Code via MCP
Head to Novamira → Configuration. The setup runs in three steps:
- Turn on AI abilities. Save settings.
- Generate an application password. This is the trusted credential the AI agent uses to act on your behalf. You only need it once during setup.
- Connect to your AI client. Novamira gives you either a copy-paste prompt to drop into your agent’s chat, or per-client snippets for Claude Code, Claude Desktop, Codex, Antigravity, etc.
I went with the prompt option. In Claude Code, I started a new session, pasted the prompt, edited it to say “for the current project,” and let Claude install the MCP into a dedicated project folder. Always create a project folder, by the way. Don’t let Claude Code roam your whole filesystem.
A new session was needed after installation for the MCP to register. After restarting, a quick “Using the Novamira MCP, list the plugins installed on my site” confirmed the bridge was live.
Wiring .mcp.json by hand
The prompt option writes this configuration for you, but it pays to know exactly what it drops in, so you can paste it yourself and debug a connection that refuses to come up. Two things need to be in place on the WordPress side first, both under Novamira → Configuration: AI abilities switched on, and an application password generated and copied. That application password (not your normal login password) is the credential the config below uses.
Claude Code reads its MCP servers from a .mcp.json file at the root of your project folder, so the connection stays scoped to just that project. Novamira talks over the @automattic/mcp-wordpress-remote transport, which Claude Code starts with npx:
{
  "mcpServers": {
    "novamira-uac": {
      "command": "npx",
      "args": ["-y", "@automattic/mcp-wordpress-remote@latest"],
      "env": {
        "WP_API_URL": "https://uac.local/wp-json/mcp/novamira",
        "WP_API_USERNAME": "your-wp-username",
        "WP_API_PASSWORD": "abcd EFGH ijkl MNOP qrst UVWX"
      }
    }
  }
}- Pass the credentials as environment variables only:
WP_API_URL,WP_API_USERNAMEandWP_API_PASSWORD. The package ignores--url/--passwordstyle CLI flags. WP_API_URLis the Novamira MCP endpoint: your site URL followed by/wp-json/mcp/novamira.WP_API_PASSWORDis the application password (spaces and all), not your normal login.npxfetches and runs that remote package on demand, which is precisely why Node.js has to be installed, no matter how you installed Claude Code itself.
Save the file, restart or reload the MCP session (most clients need it), then verify by asking the agent to list the server’s tools. If it won’t connect, the stderr from the npx process is the first place to look.
Local dev over HTTPS: the self-signed certificate snag
Local environments (LocalWP, Herd by Laravel, DDEV, Lando) serve .local, .test, .ddev.site and .lndo.site hostnames over HTTPS using a self-signed certificate. Node rejects those by default, so the npx transport can never finish the TLS handshake, and the MCP server fails to start. Using the prompt method, Novamira spots a local hostname and adds one env var to the snippet to get you past it:
"env": {
  "WP_API_URL": "https://uac.local/wp-json/mcp/novamira",
  "WP_API_USERNAME": "your-wp-username",
  "WP_API_PASSWORD": "abcd EFGH ijkl MNOP qrst UVWX",
  "NODE_TLS_REJECT_UNAUTHORIZED": "0"
}
NODE_TLS_REJECT_UNAUTHORIZED=0 tells Node to stop verifying TLS certificates for that process. It’s the quick fix, and on a throwaway local box, it’s perfectly acceptable. But be clear on the trade-off: it disables certificate checking for every request that Node process makes, not just the one to your dev site. Never carry it into anything that talks to the open internet.
The tidier alternative is to trust only your local certificate and leave verification on for everything else. Point Node at the actual self-signed cert with NODE_EXTRA_CA_CERTS instead of switching validation off wholesale:
"env": {
  "WP_API_URL": "https://uac.local/wp-json/mcp/novamira",
  "WP_API_USERNAME": "your-wp-username",
  "WP_API_PASSWORD": "abcd EFGH ijkl MNOP qrst UVWX",
  "NODE_EXTRA_CA_CERTS": "/absolute/path/to/uac.local.crt"
}
Finding that certificate depends on the local tool you run. You can prompt your AI agent, like Claude Code, to locate your local certificate authority and append it to your Novamira MCP server using the NODE_EXTRA_CA_CERTS. Then restart your Claude session.
If you can’t track down a file (or would rather not guess), pull the certificate the site actually serves straight off the wire with OpenSSL, which works whichever tool generated it:
echo | openssl s_client -connect uac.local:443 -servername uac.local 2>/dev/null | openssl x509 > uac.local.crtThen point NODE_EXTRA_CA_CERTS at the uac.local.crt it writes. Node trusts your dev site, every other certificate is still checked, and the MCP bridge connects cleanly.
First task: site clean-up in one command
I dictated this into Claude Code using OpenWhispr:
Using Novamira MCP, please remove all unnecessary themes, keeping only the 2025 theme as a backup. Delete all sample posts and pages. Then create four pages: homepage, blog, about, contact. Set the homepage as the static front page and the blog as the posts page in the reading settings. Finally, set the time zone to London and use English (United Kingdom).
A few minutes later, the agent reported back: the Hostinger AI theme, 2024 and 2023 themes had been deleted; 2025 retained as backup; Bricks and Bricks Child preserved (active); four pages created; reading settings updated; locale and time zone switched to en_GB / Europe/London.
That command alone would have been a five-minute clicking exercise across three admin screens. That time can now be spent sipping some coffee.
Scaffolding CPTs with Meta Box
Next session:
Initialise the Claude Code project for “Universal Access Conference” using the Novamira MCP. Configure the custom instructions and memory for this project. Then define the initial CPT data structure for an accessibility conference (speakers, sessions, sponsors), and ask me any questions before you proceed.
The agent spotted that multiple plugins on the site could own the CPTs (Meta Box, ASE) and asked which to use. I picked Meta Box. It asked which entities to model. I confirmed speakers, sessions, sponsors and added partners, left venues as a future taxonomy, and mentioned it was a recurring annual event.
It then created a Claude Code project context, set custom instructions, seeded the memory with the project facts, and generated a new user skill called uac-project-context, and registered the CPTs in Meta Box along with appropriate custom fields for session details, speaker profiles, sponsor tiers and so on.
Critically, the CPTs were registered through Meta Box’s UI-driven config, not by writing a register_post_type() call in PHP. That’s the Novamira default: if a data-modelling plugin owns the territory, use the plugin. Splitting the source of truth between custom PHP and a plugin UI breaks things the next time anyone touches either side.
Demo content and media organised with HappyFiles
A fresh CPT shell needs content:
Using the already defined CPT structure, please populate the site with some realistic demo content. Add demo speakers, sessions and related post types. Pull placeholder featured images from an external source like Pexels and write body content too.
Done. Then:
Check all newly created posts. If the featured image doesn’t match the post title, download a fresh one and replace it. Then use HappyFiles to organise all images into appropriate folders.
The agent asked sensible clarifying questions: “Replace mismatches with topical images? Generate text-based logos for fictional sponsors, or use abstract-themed images?” Then it ran through every CPT, swapped mismatched images, and filed everything into HappyFiles folders for partners, sponsors, sessions and speakers.
Importing a CSS framework into Bricks
If you’re not running ACSS, ATF, or Core Framework, importing your CSS framework into Bricks typically means either using the Bricks framework importer, which may miss some CSS, or hand-mapping every variable, class, and colour. Not any more.
I had a variables.css and a classes.css in a local assets folder. I told Claude:
Read the design tokens from the local assets folder (variables and classes) and register the CSS variables, classes, colours and other global styles into Bricks, mapping to correct values. Also check the
.wrapperclass and apply it as the container CSS styles. And remember the HTML font-size should be 100%, not 62.5%.
The agent already knew I was using Bricks, without me having to specify. It read the local files, populated a new theme style called “UAC Base Styles”, configured the global condition set for the entire site, applied site background colour and typography, set HTML font-size to 100%, applied the .wrapper width / max-width / padding to the container element, registered every utility and component class, populated CSS variables into categories, and replaced the default colour palette with my brand colours.
Open Bricks, refresh the page, and the styles were live.
Cloning sections with the Playwright MCP
The final test: can it rebuild a section from another website?
I installed the Playwright MCP into Claude Code (I just asked Claude to install it for me, done in two minutes), started a new session, and gave it a URL plus an instruction:
Using the Playwright MCP, check the hero section from this URL and recreate it in my homepage using Bricks via the Novamira MCP.
Playwright browsed the page, took snapshots, inspected the markup, and the Novamira MCP rebuilt the section in Bricks. I previewed the front end: identical layout. I then repeated the trick with a testimonial card from another site, asking the agent to recreate it as a loop for speakers on the homepage. Same result: visual match, hover effects working.
One caveat: Bricks SVG icons. Bricks supports three SVG sources: inline code, icon set or file upload. Inline requires signing the code, and that signature currently can’t be generated via the MCP. So the agent had to switch to file uploads. It downloaded each SVG, installed the Safe SVG plugin, uploaded the file, and used it in the loop. Works fine, just worth knowing.
Pushing to live and shared memory
Novamira is bound to the URL of the site it’s installed on. The moment your environment switches to the live URL, its AI abilities deactivate automatically, even though the plugin itself is still installed. So your workflow is:
- Build everything on your local or staging site with Novamira active.
- Once you’re happy, push to live using any staging to live tool like ASE’s backup and sync feature or WP Migrate. If you don’t need PHP at runtime, you can do a static export.
- On live, Novamira sits dormant. The site runs as a normal WordPress site.
While you’re working, Novamira’s shared memory captures any fixes or errors the agent encounters and resolves. Because that memory lives in WordPress, not in the agent, you can start a session in Claude Code, switch to Codex, and your skills, memory and project context come with you.
That portability, combined with the fact that everything runs against a real WordPress install instead of a hallucinated mental model of one, is what makes this setup feel different from “AI for WordPress” attempts I’ve tried before.
Try it yourself
If you’d like to try Novamira yourself, grab it via my affiliate link: Novamira. It really is worth it.
Some links above are affiliate links. I may earn a small commission at no extra cost to you. Thank you for supporting the channel!
Comments
No comments yet — be the first.
Leave a comment
Replying to .
Thanks — your comment is in
It's awaiting moderation and will appear after it's approved and the site is rebuilt.