Introduction
One unique advantage WordPress offers is the ability to create maintainable websites by reusing content. If you have a massive list of options you want to reuse in different forms, JetEngine—a powerful WordPress plugin for managing custom post types and custom fields—has a glossary feature that allows you to save large lists of data (either manually or via CSV/JSON) to be reused in form select fields. For example, you can save a list of countries, affiliate links or businesses and reuse them in multiple forms without creating separate options pages.
Although Bricksforge supports directly uploading JSON data to the array fields, JetEngine glossary gives you a better UI to manage the JSON data with the added advantage of being reusable in multiple forms and pages.
In this tutorial, you’ll learn how to retrieve data from the JetEngine glossary and use it in a Bricksforge Pro Form.
Requirements
Step-by-step guide
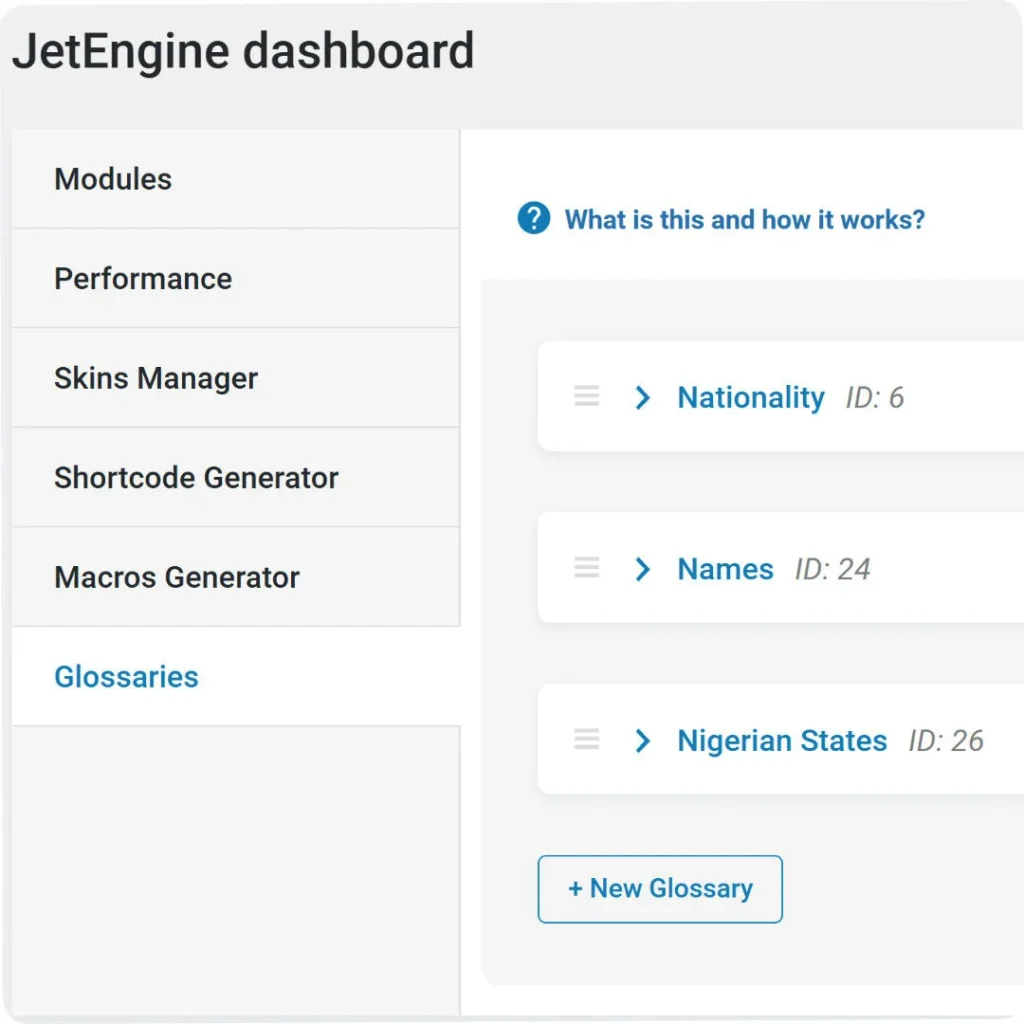
Create a JetEngine glossary
- Navigate to WordPress Dashboard → JetEngine → Glossaries.
- Create a new glossary with your list of options.
- After saving, note the ID of your newly created glossary post.
Add the code snippets
Using your preferred code snippets plugin (such as WPCodeBox) or your Bricks Builder child theme’s functions.php file, add the following two code snippets:
Snippet 1: Glossary Retrieval Function
<?php

/**
 * Get meta fields from jet_post_types as JSON
 *
 * @param int $id The ID of the jet_post_type to retrieve meta fields from
 * @return string JSON string containing label and value pairs
 */
function get_glossary_json($id) {
    global $wpdb;

    // Sanitize the ID input
    $id = intval($id);

    // Return error if no valid ID provided
    if ($id <= 0) {
        return json_encode(array('error' => 'Please provide a valid ID.'));
    }

    // Get the meta_fields from the database
    $meta_fields_serialized = $wpdb->get_var(
        $wpdb->prepare(
            "SELECT meta_fields FROM {$wpdb->prefix}jet_post_types WHERE id = %d",
            $id
        )
    );

    // Return error message if no data found
    if (empty($meta_fields_serialized)) {
        return json_encode(array('error' => 'No meta fields found for ID: ' . $id));
    }

    // Try to unserialize the data
    $meta_fields = @unserialize($meta_fields_serialized);

    // Check if unserialization was successful
    if ($meta_fields === false) {
        return json_encode(array('error' => 'Error processing meta fields data.'));
    }

    // Create simplified array with just label and value
    $simplified_fields = array();
    foreach ($meta_fields as $field) {
        $simplified_fields[] = array(
            'label' => $field['label'],
            'value' => $field['value']
        );
    }

    // Return as JSON
    return json_encode($simplified_fields, JSON_PRETTY_PRINT);
}

/**
 * Usage example:
 *
 * Echo the JSON directly (e.g. in a template file)
 * echo get_glossary_json(8);
 *
 */
Snippet 2: Whitelist Echo Function for Bricks
<?php

add_filter( 'bricks/code/echo_function_names', function() {
  return [
    'get_glossary_json',
  ];
} );
Set up the Bricksforge Pro Form
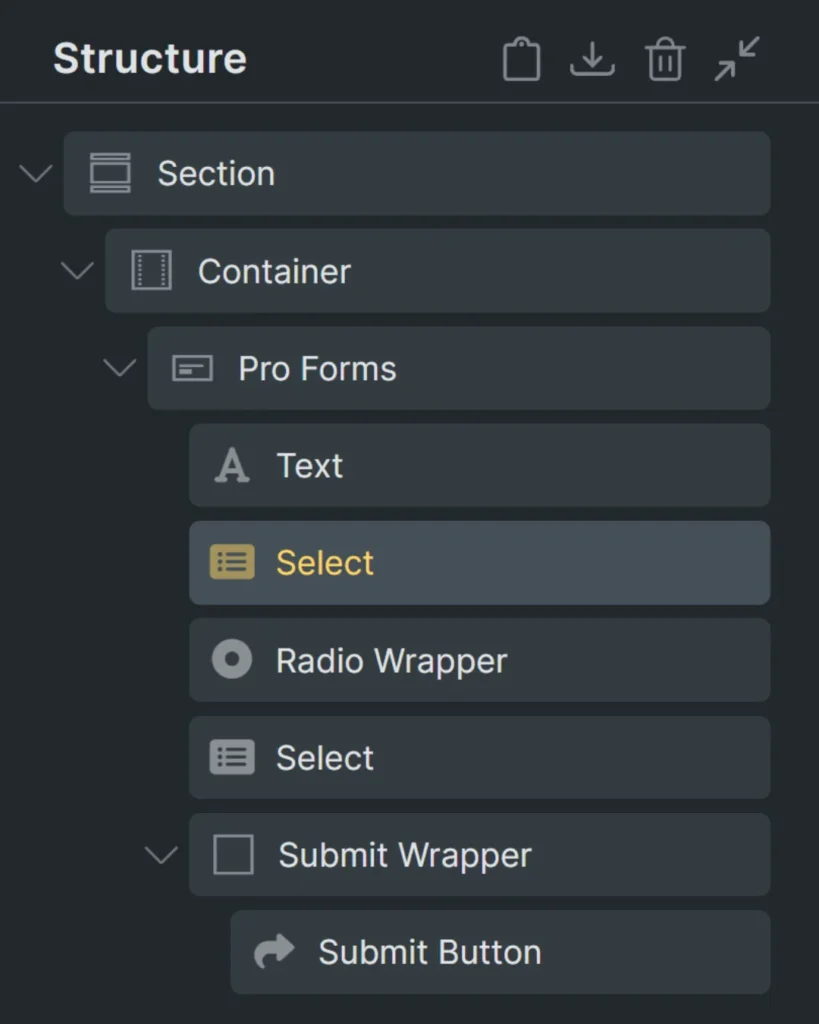
- Create a new Bricksforge Pro Form.
- Add your desired form fields, including the field you want to populate with glossary data (Select, Checkbox Wrapper, or Radio Wrapper).
- For the array field you want to populate:
- Delete the nested option element.
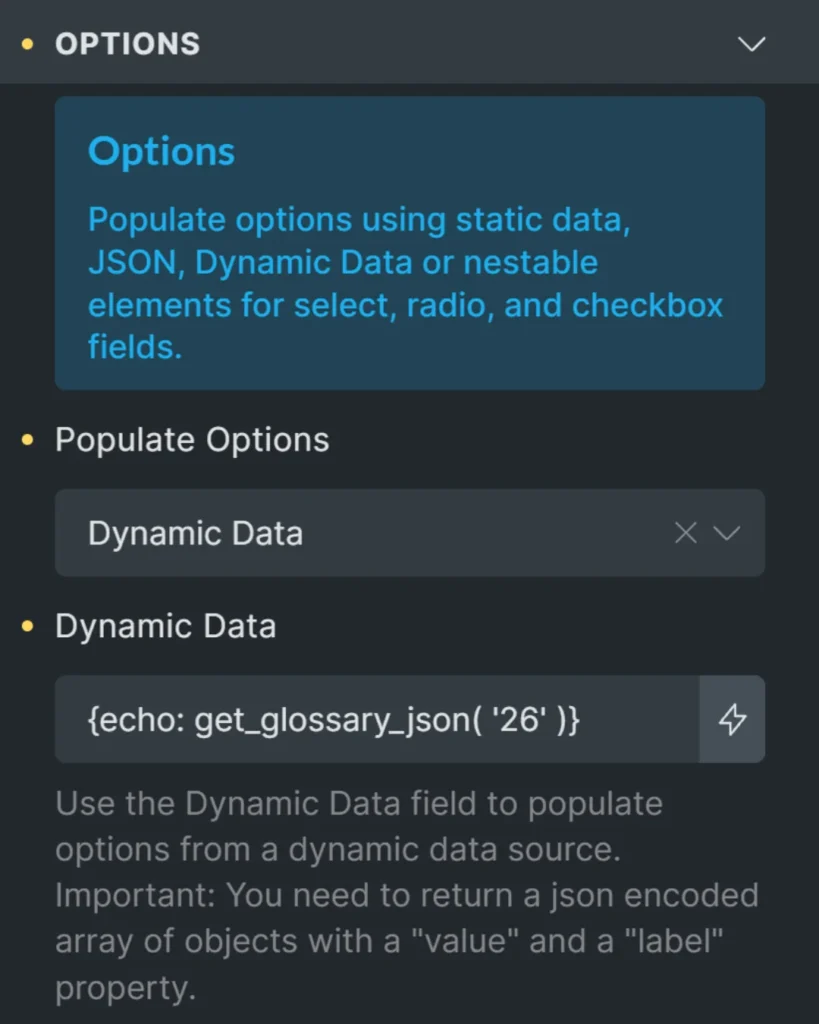
- Go to the Options panel in the parent element.
- Change the Populate option to Dynamic Data
- Enter the following dynamic data:
{echo: get_glossary_json('26')}(Replace ’26’ with your actual glossary ID)
Test your form
Preview your page to verify that the form field is properly populated with your glossary data.
How it works
- The first code snippet creates a function that:
- Retrieves the glossary data from the JetEngine database table
- Processes the data into a simple array of label/value pairs
- Returns the data as JSON
- The second code snippet whitelists our function so it can be used with Bricks’
{echo}functionality - When the form loads, Bricksforge retrieves the JSON data through the dynamic data function and populates the dropdown options automatically
Method 2: Populate the field with Dynamic Shortcodes (no code snippets)
The method above works well, but it relies on a small PHP snippet. If you use the Dynamic Shortcodes plugin, you can populate the same field with no custom PHP at all—Dynamic Shortcodes reads the JetEngine glossary directly and hands Bricksforge the JSON it needs. As a bonus, this approach doesn’t require the Bricks code-execution setting that Method 1 depends on.
Create a Power Shortcode
Power Shortcodes are reusable Dynamic Shortcodes that run with full privileges, which is what lets them read data. Go to Dynamic Shortcodes → Power Shortcodes, add a new shortcode named glossary_options, and paste this as its code:
{call: {array: {call:jet_engine |. glossaries |. data} get_item_for_edit} {args:||0} ||fields |json_encode}Use the Power Shortcode in your form
Set up the Bricksforge Pro Form exactly as in Method 1, but for the field’s Populate → Dynamic Data value, use the Power Shortcode instead of the echo function:
{pw:glossary_options 26}Replace 26 with your own glossary ID. There’s no PHP function to maintain and no bricks/code/echo_function_names whitelist to add.
How it works
{pw:glossary_options 26}runs the Power Shortcode, passing your glossary ID as its first argument.jet_engine |. glossaries |. datawalks straight to JetEngine’s glossary data object, andget_item_for_edit()loads your glossary by ID.||fieldsgrabs the list of items—JetEngine already stores them asvalue/labelpairs, exactly the shape Bricksforge expects.|json_encodeturns that list into the JSON string the select field reads.
Troubleshooting
- If your select field appears empty, double-check your glossary ID.
- Ensure both code snippets are properly added and active.
- Verify that your JetEngine glossary contains data
Final thoughts
Combining JetEngine’s glossary feature with Bricksforge forms can help you create reusable, maintainable form elements that pull from a central data source. This approach is especially valuable for sites that need consistent options across multiple forms.
Comments
No comments yet — be the first.
Leave a comment
Replying to .
Thanks — your comment is in
It's awaiting moderation and will appear after it's approved and the site is rebuilt.